


Want to build a mobile app but don’t know where to start or how to plan your budget?
This guide covers the essentials: key cost factors, typical price ranges, and practical tips for using React Native. You’ll learn how to save time, optimize development, and create high-quality apps for both iOS and Android — whether you’re launching a startup MVP or a full-featured enterprise product.

React Native is a tool that lets you build apps for both iOS and Android at the same time using one codebase. This approach can save 30–40% of mobile app development costs compared to creating separate native apps.
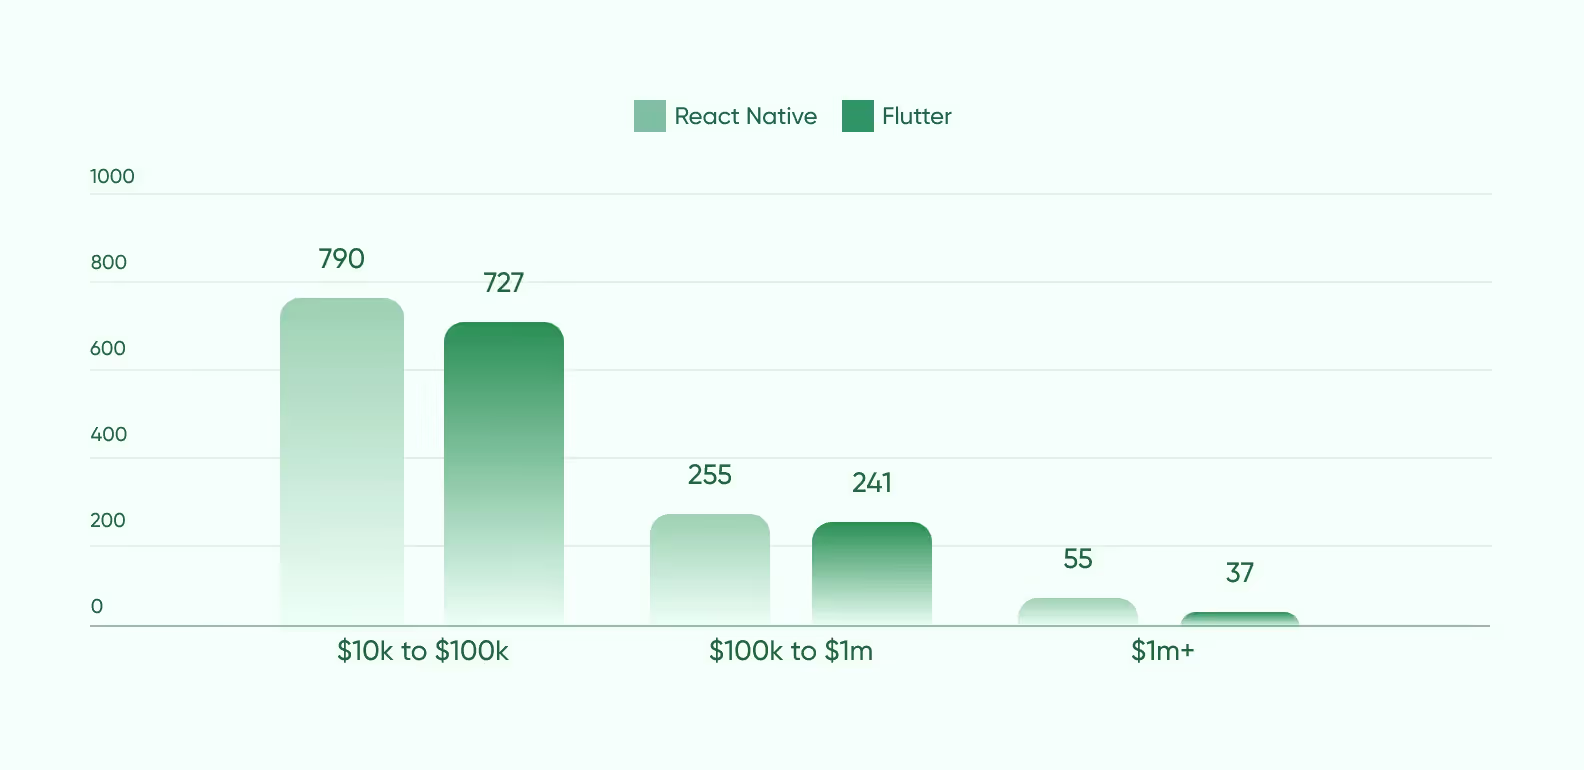
As of October 2024, 790 React Native apps earned $10,000–$100,000 per month, showing that these apps can be profitable and highlighting why understanding costs is important.
The cost of React Native app development is shaped by several key elements. The first is design and user experience — clean visuals and custom animations can increase the design timeline. The second factor is functionality. Adding advanced features like geolocation, payment gateways, or social authentication requires more development hours.
Another important component is backend infrastructure. Apps that need live data or complicated features require a stronger setup, which takes more time and money. After launch, costs for maintenance, updates, and keeping the app fast also add to the total budget.
Below are average cost ranges for React Native app development based on project type and complexity. These estimates assume a professional development team working with standard agile practices.
In general, smaller MVPs and startup apps sit at the lower end of the pricing spectrum, while scalable enterprise or on-demand platforms fall on the higher side.
When estimating the cost of React Native app development, it’s not enough to look only at the hourly rates or the size of the team. The real budget depends on what the app is supposed to achieve, who it’s built for, and how complex its functionality will be.
The final cost depends on business goals, design quality, which platforms the app will run on, and plans for after launch.
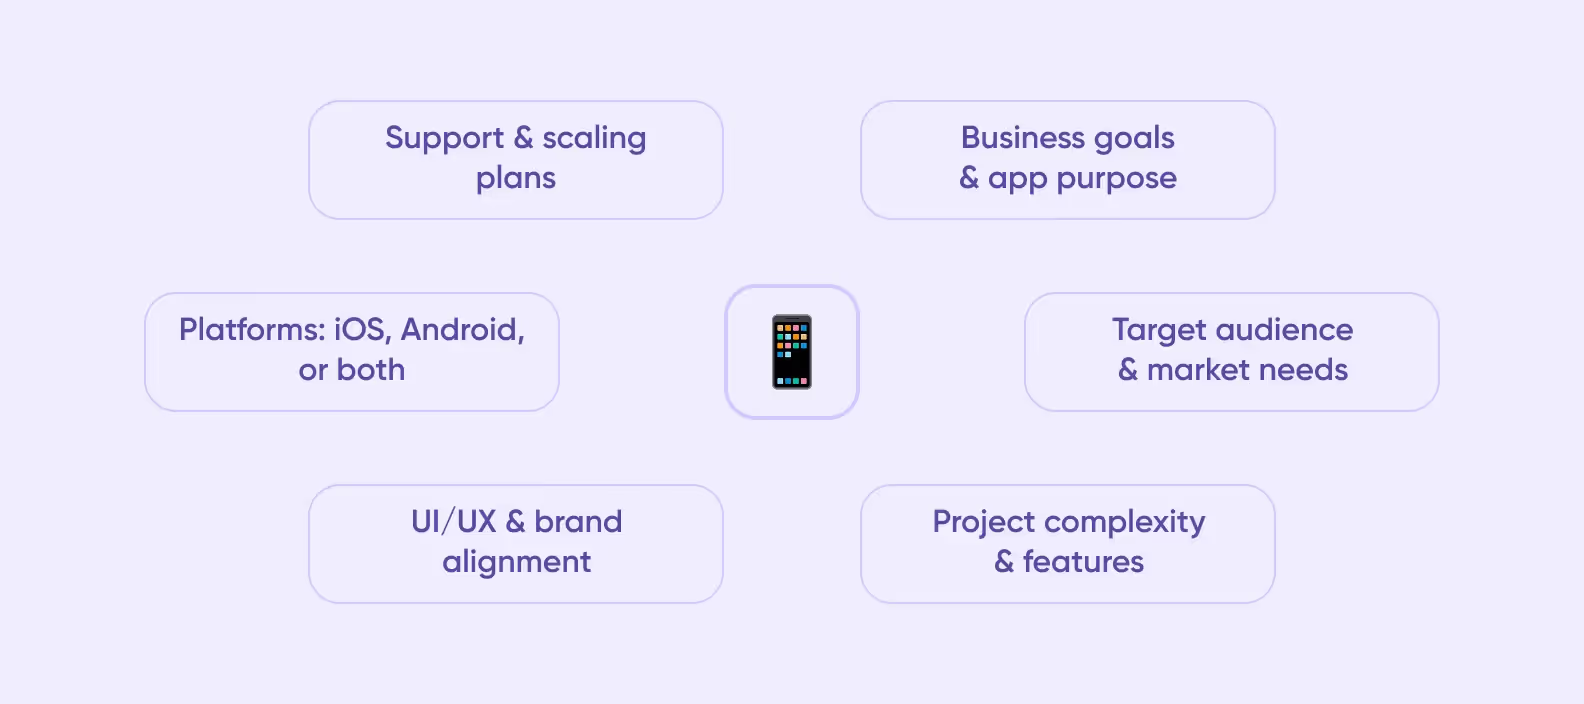
Every app starts with a business goal — and that goal defines its development strategy and cost. An MVP for market testing will require fewer features, less design time, and a smaller budget compared to a fully functional enterprise product.
For example, a startup that needs to validate its idea may invest in essential features like sign-in, content display, and analytics. On the other hand, a large enterprise developing an internal tool for data management or customer engagement will likely need complex integrations, custom APIs, and a more extensive backend.
The audience determines what users expect from the app’s design, ease of use, and performance, which affects the cost. Apps for a global audience need localization, regional payment systems, and accessibility features. These extra requirements make development and testing take more time.
In contrast, a local or niche app might cost less to build but still requires precise adjustments for its user base. For example, a fitness app for professionals may need advanced tracking and analytics, while a casual wellness app might focus on simple engagement and motivation.
Market competition also plays a role. If users expect high-quality, feature-packed apps in your niche, your app needs to match or surpass them.
The complexity of a React Native app is the single biggest driver of cost. Each additional feature — push notifications, in-app payments, real-time messaging, maps, or video streaming — adds layers of logic, integrations, and testing.
A simple app with a few static screens and limited interactions might take a few weeks to develop. An app with custom APIs, real-time updates, and complex backend logic can take several months to build.
Integration with third-party services like Stripe, Firebase, or AWS also affects cost. React Native makes building for multiple platforms easier, but complex features still need separate tweaks for each system to run smoothly.
Design quality can take up a large part of the budget. A visually rich, branded interface with custom animations, transitions, and accessibility standards requires close collaboration between designers and react native developers.
If the brand already has established design guidelines, the app must match them perfectly — from typography to motion behavior. This alignment ensures visual consistency but adds extra design hours.
Creating interactive prototypes and testing usability helps check the user experience before a development process starts. This costs more upfront but lowers the risk of costly redesigns and improves user retention after launch.
React Native’s main advantage is cross-platform development — building one app for both iOS and Android with a shared codebase. However, “shared” doesn’t always mean “identical.”
If the app requires platform-specific UI components, device APIs, or integrations (for instance, Apple Pay vs. Google Pay), developers will still need to write custom code. Supporting both platforms generally adds 20–30% to the total cost compared to building for one.
Startups testing an idea can save money and launch faster by starting on one platform.
After the app gains traction, adding the second platform is a cost-effective step.
The app development process doesn’t stop at launch. Maintenance, monitoring, and updates are essential to keep the app stable and competitive. Most companies allocate around 15–25% of their initial budget for annual maintenance and scaling.
Regular updates keep the app compatible with new OS versions and libraries, fix bugs, and improve performance. As the user base grows, the backend may need upgrades, new APIs, or stronger security.
A good post-launch plan also gathers user feedback, analyzes behavior, and improves the app experience. These steps increase long-term costs but make the app a lasting business asset.
One of the main reasons companies choose React Native is its cost efficiency. The framework reduces both development time and expenses. While native app development requires building and maintaining two separate codebases for iOS and Android, React Native offers a unified approach — a single technology stack that covers both platforms.
React Native also offers reusable components, a large community, and a supportive ecosystem. These help speed up development, simplify maintenance, and reduce overall costs.
Below are the main ways React Native helps businesses reduce app development costs.

Instead of maintaining two separate development teams and workflows, companies can use one shared codebase. This approach cuts coding time by up to 40% and ensures faster delivery across platforms.
It also simplifies debugging and feature updates. When a bug is fixed or a feature is added in the shared code, it automatically applies to both platforms. That means fewer inconsistencies between app versions and lower long-term maintenance effort.
React Native speeds up development with hot reloading and modular architecture. Hot reloading lets developers see changes instantly without rebuilding the app. This makes testing and iteration faster.
Modular architecture breaks code into independent blocks, which results in easier updates and parallel work.
Such features shorten project timelines, helping businesses launch MVPs, gather feedback, and improve their apps more quickly than with native development.
React Native provides a wide range of reusable components that can be adapted for an app. Developers can use ready-made UI elements, libraries, and third-party integrations to avoid writing everything from scratch.
This reusability improves consistency across the app’s interface. Common elements such as navigation bars, buttons, and forms can be standardized, reducing design and testing time.
Maintaining a React Native app is cheaper than supporting two separate native apps. Since most of the code is shared, updates, bug fixes, and performance improvements can be deployed simultaneously on both platforms.
This reduces the workload for QA teams and minimizes the risk of platform-specific issues. The React Native ecosystem updates frequently, keeping libraries compatible with the latest iOS and Android versions.
For businesses, this means easier maintenance, less developer time, and lower overall costs over the app’s lifetime.
React Native has a big developer community backed by Meta and many open-source contributors. The community offers libraries, templates, and tools that make development easier.
Developers can use pre-built packages for features like login, notifications, or analytics instead of creating them from scratch. Community support helps fix issues faster and offers current best practices, saving time and effort.
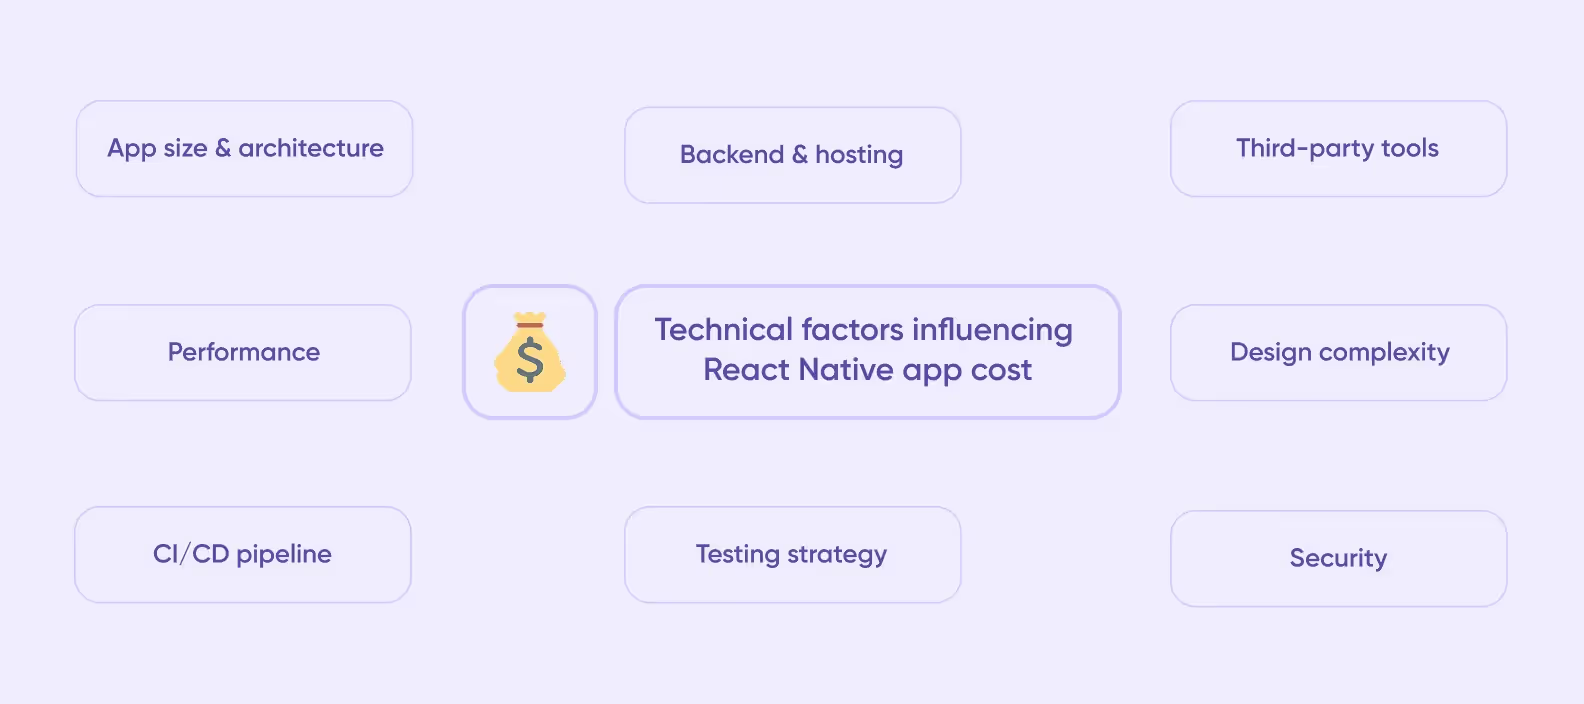
The app’s architecture, backend, tools, and testing approach affect both the initial and long-term costs. Knowing these factors helps companies plan better and avoid surprises later in the development process.
A small app with few features needs a simple setup, fewer tools, and less development time.
A bigger app with modules like login, payments, real-time notifications, and analytics requires a more complex architecture.
Each new feature adds not only coding time but also complexity in managing data flows and dependencies. To control costs, it’s important to design the architecture early and define clear feature priorities. This ensures scalability without unnecessary technical debt.
The backend controls how an app handles and accesses data and can make up a large part of the cost. Apps with real-time updates, personalized content, or multiple users need a strong backend.
Developers can build a custom backend or use cloud services like AWS, Firebase, or Supabase. Cloud options are faster to set up and cheaper at first but come with ongoing hosting and usage costs.
The right approach depends on traffic volume, data sensitivity, and scalability needs. A lightweight backend can be affordable at first but may require refactoring as user numbers grow.
<div class="post_divider"></div>
⭐Our experience
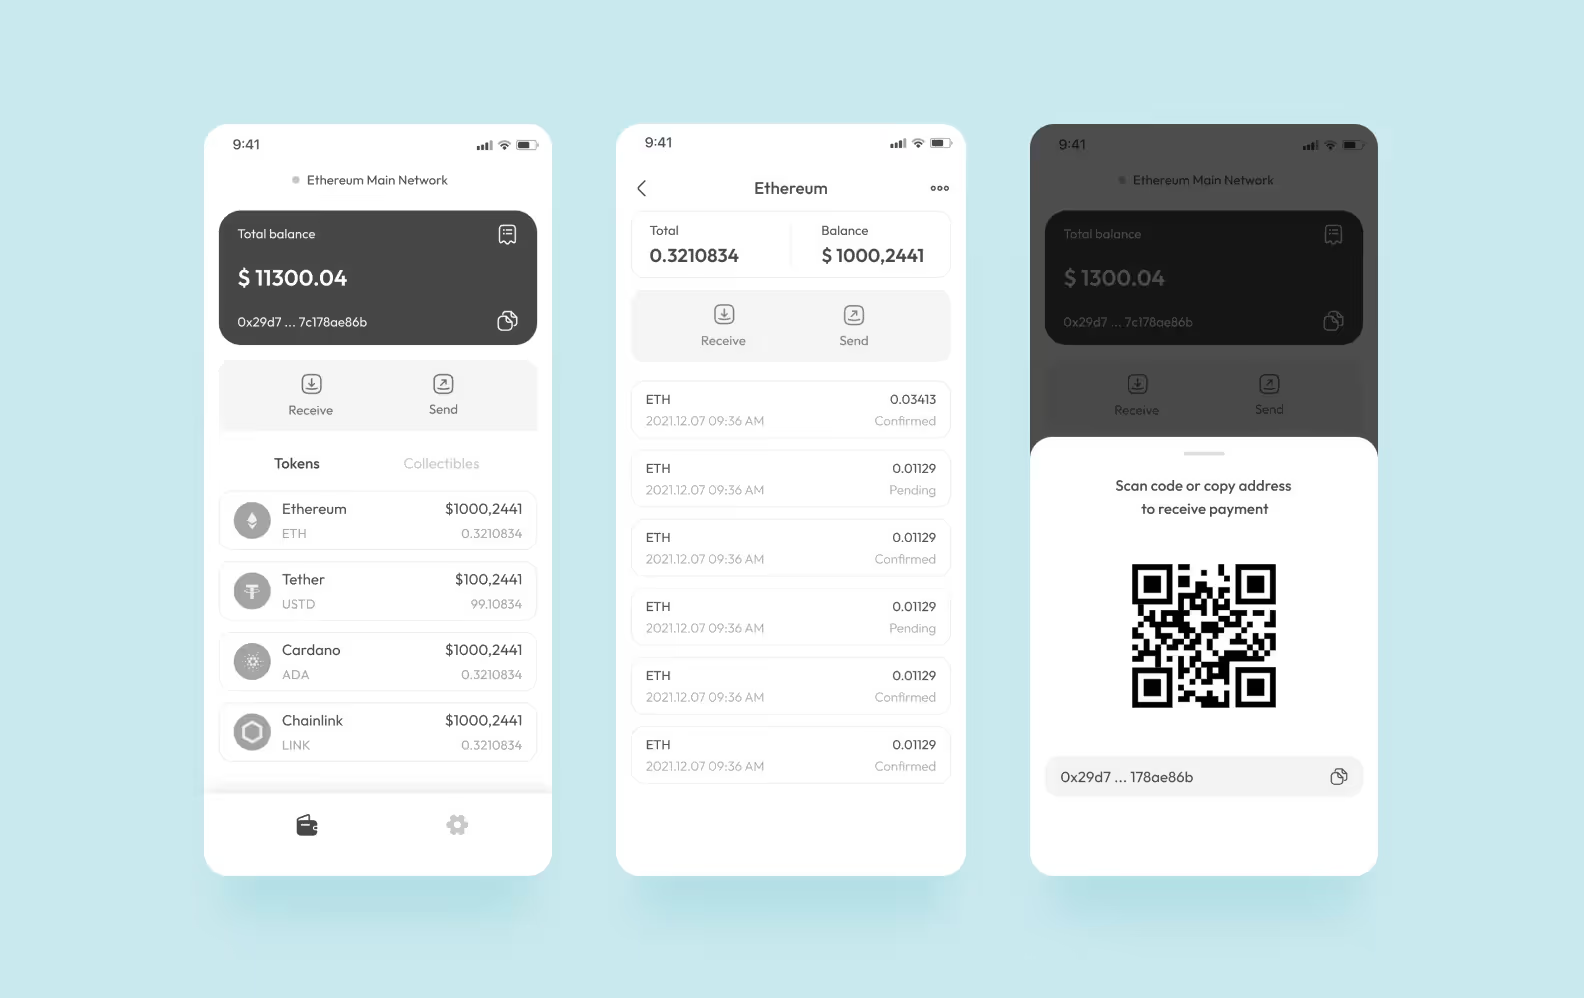
Purrweb built a crypto wallet without a traditional backend. The app uses free APIs — etherscan.io, infura.io, cryptocompare.com, opensea.io, and moralis.io — to manage token balances, NFTs, and transaction history. This setup keeps the app stable under API limits. It also reduces costs and keeps user data anonymous.
The result of the project is a working MVP that can scale. The case shows how smart backend choices improve cost, security, and efficiency.
<div class="post_divider"></div>
Using external APIs and paid services — like maps, payments, analytics, or push notifications — makes development easier but adds ongoing costs. Many tools have free plans, but advanced features often require monthly fees.
Each integration needs development and testing to work well across platforms. Relying too much on third-party tools can be risky, so it’s important to balance convenience with long-term costs.
Custom animations, gestures, and transitions make the app more engaging but take more development time. Smooth motion needs optimization and testing on different devices.
Complex visuals, like 3D interactions or native modules, take longer than static layouts. To save time and money, teams often mix custom animations with ready-made UI libraries while keeping the design consistent.
<div class="post_divider"></div>
⭐Our experience
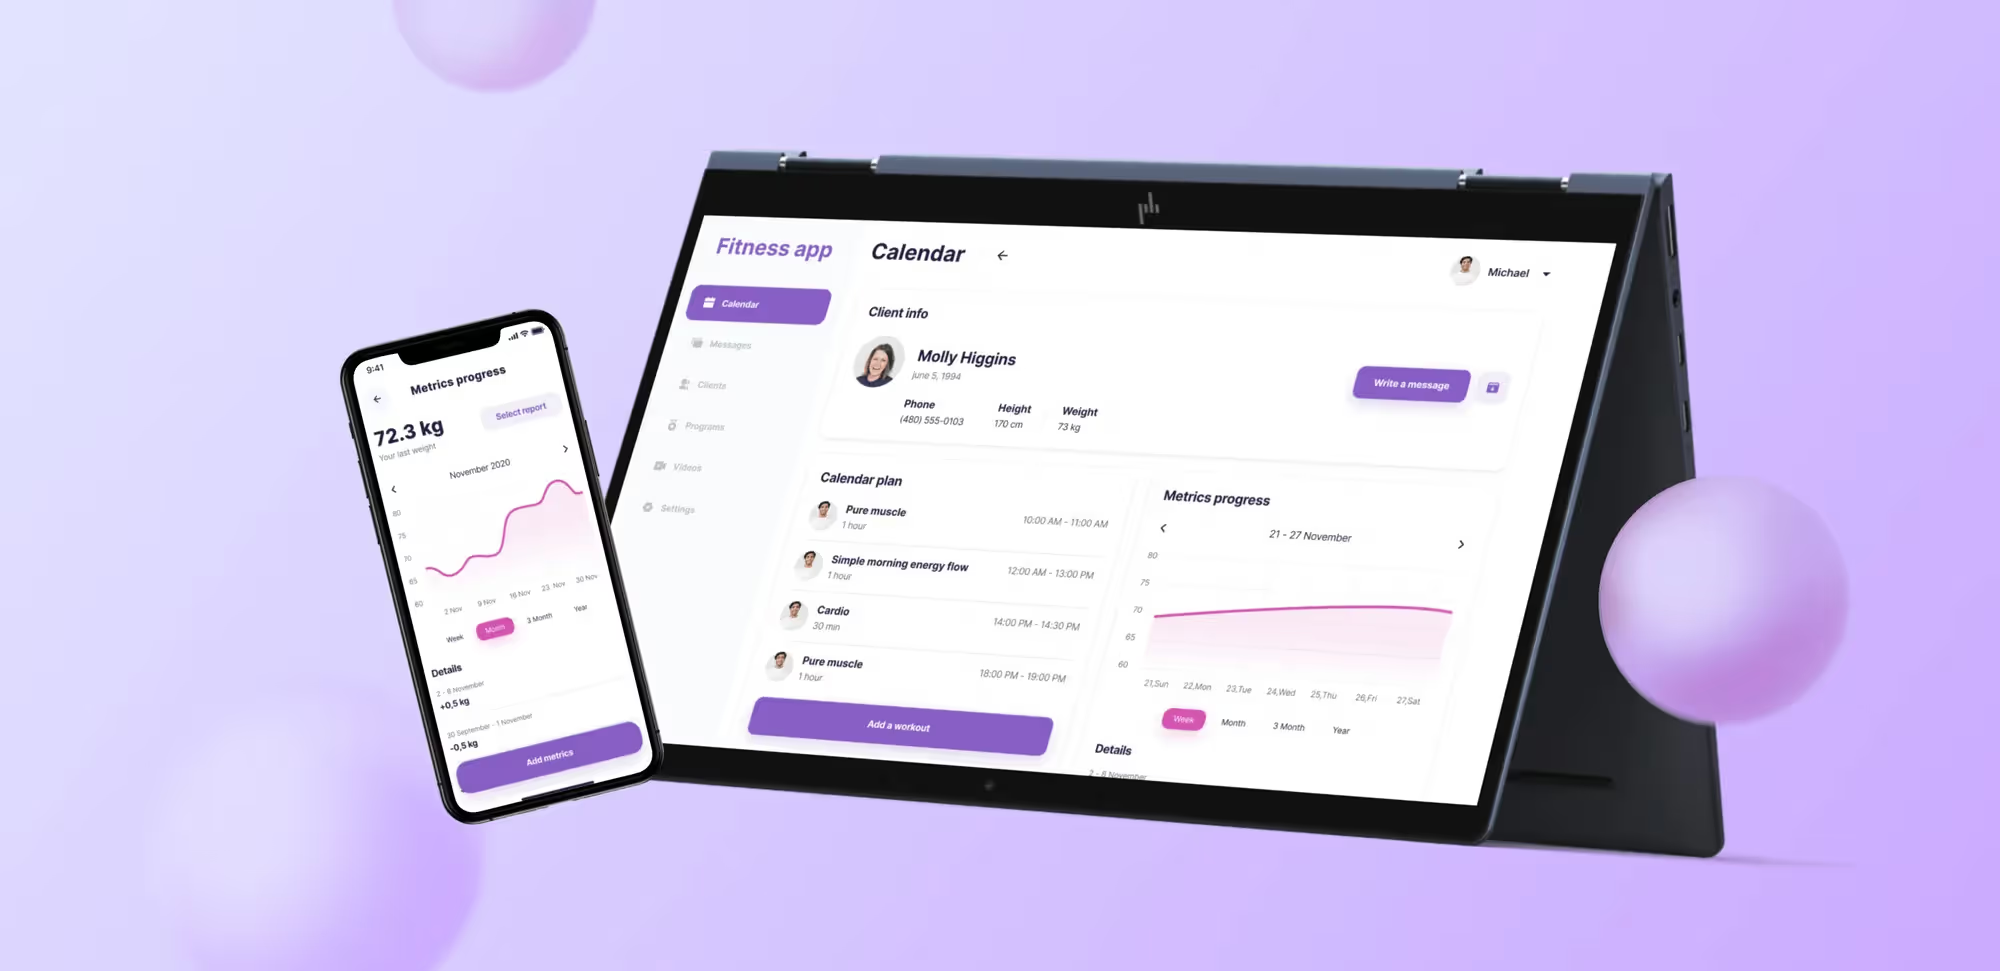
Purrweb built FitnessApp, a web app for coaches and a mobile app for clients. It included schedules, programs, chats, notifications, and calendars.
A nine-person team completed it in three months using React Native, React, Node.js, and TypeScript. Tools like Vercel, Vimeo, S3, Auth0, Stripe, Pusher, and Firebase saved time and budget.
The result is a full-featured MVP that shows how clear planning and smart tools simplify development.
<div class="post_divider"></div>
Apps that deal with sensitive data — like personal info, payments, or health records — need strong security. Adding encryption, secure login, and meeting rules like GDPR or HIPAA takes more time and money.
Security testing and audits are essential parts of this process. Though they add to the initial budget, they reduce the risk of data breaches and potential legal liabilities, which are more costly in the long term.
CI/CD pipelines automate building, testing, and deploying the app. Setting them up takes extra work at first but saves time and cost for future updates and maintenance.
Automated deployment reduces human errors and ensures consistent app performance across environments. For projects with frequent releases, investing in CI/CD early is a cost-effective strategy.
Manual testing is cheaper initially but less scalable, especially for complex apps or frequent updates. Automated testing, on the other hand, involves higher setup costs but pays off over time through faster release cycles and fewer regressions.
Using both manual testing for user experience and automated testing for core functions gives the best coverage and saves time in the long run.
React Native apps must remain fast and responsive as their user base grows. Optimizing performance with techniques like lazy loading, caching, and efficient memory use takes extra time but keeps the app stable in the long run.
Scalability planning also impacts cost. Planning the app’s architecture to handle more users, growing data, or new features takes careful thought but avoids expensive fixes later.
The total cost of developing a React Native app depends not only on the app complexity but also on who builds it and where. The structure of the development team, their expertise, and geographic location have a direct impact on pricing.
An in-house team offers full control and close communication throughout the project but comes with higher fixed costs. In-house development can be costly due to salaries, benefits, hardware, software, and office expenses. It works best for companies with ongoing projects or sensitive technology that needs strong security.
Outsourced teams, on the other hand, provide flexibility and cost savings. By partnering with a software agency or remote developers, businesses can access global talent at lower hourly rates. Outsourcing also reduces management overhead and recruitment time. Modern collaboration tools make communication smooth, even across time zones.
However, the success of outsourcing depends on choosing a mobile app development company. It should have a proven React Native portfolio and provide clear communication.
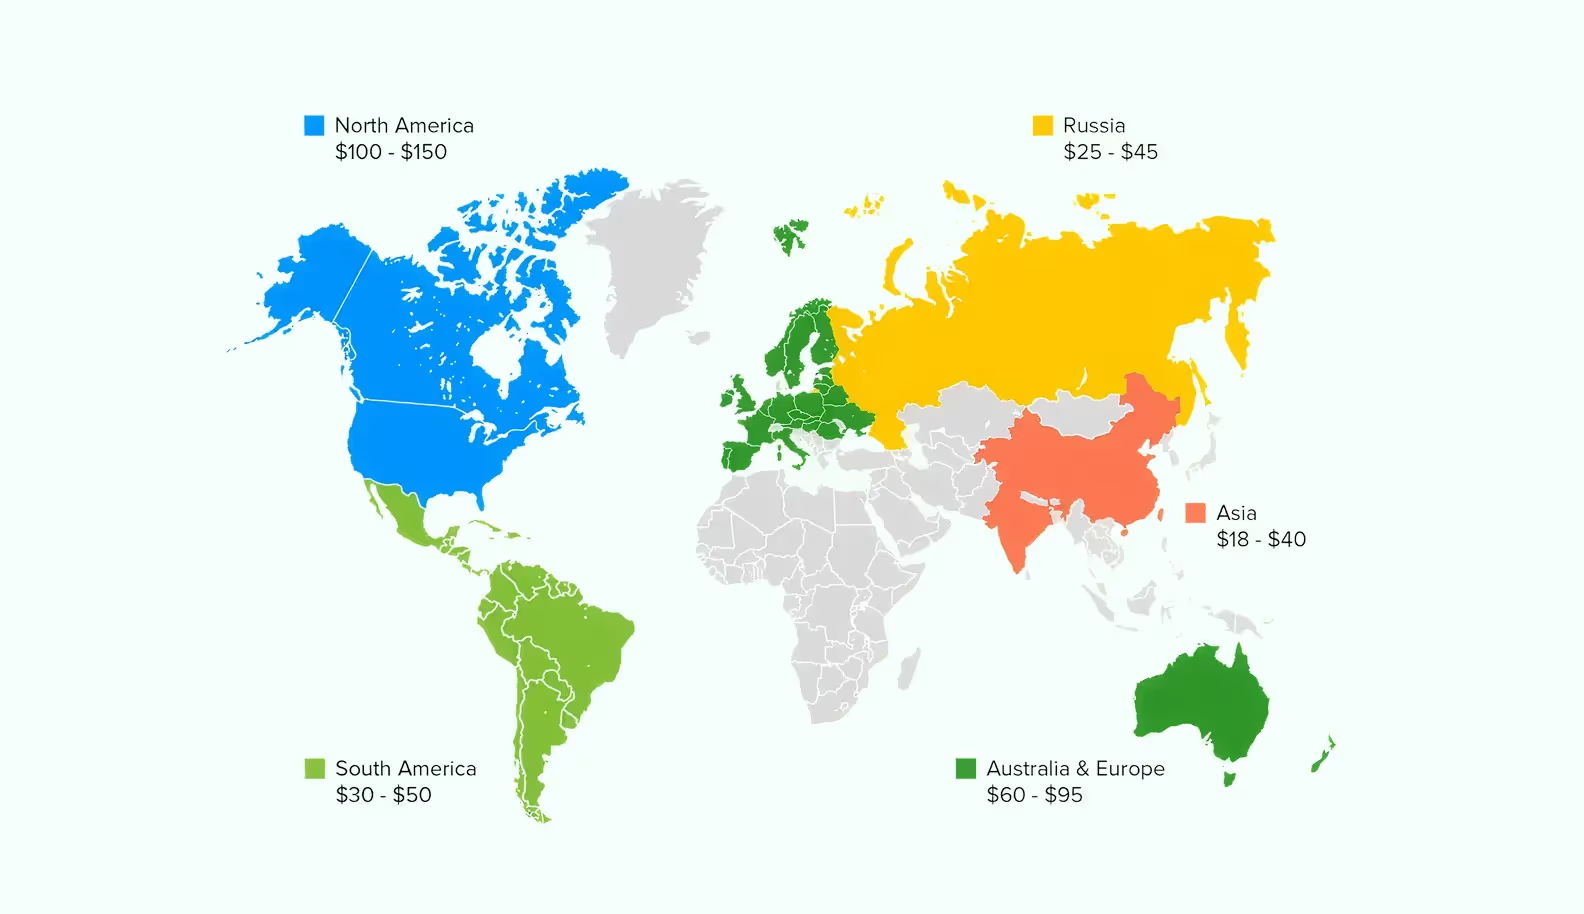
The cost of React Native development differs depending on location. North America remains the most expensive, with rates ranging from $100 to $150 per hour, followed by Australia and Western Europe at $60–$95 per hour. Developers in South America typically charge $30–$50 per hour, offering a good balance between cost and quality.
Russia averages $25–$45 per hour, while Asia — including India and other parts of the region — provides the most affordable options at $18–$40 per hour. Many companies combine teams across these regions to optimize both costs and delivery efficiency.
Time zone differences and varying quality standards can affect project communication and speed. For many companies, a hybrid approach — combining local project management with offshore development — delivers the best balance between cost and control.
A typical React Native development team includes a project manager, UI/UX designer, frontend developer, backend developer, and QA engineer. Depending on the project scope, additional specialists such as DevOps or business analysts may join.
Costs increase with seniority and specialization. Senior developers command higher rates but deliver cleaner, more scalable code, often saving time in the long run. A well-balanced team — where expertise matches the app complexity — keeps work efficient and costs under control.
React Native isn’t the perfect fit for every product, but in many cases, it offers a balance between speed, cost, and functionality.
For startups, keeping costs low is crucial. React Native uses one codebase for iOS and Android, saving time and money compared to making two separate native apps.
Startups can launch faster, get early user feedback, and improve the app without overspending. React Native’s modular design also makes it easier to scale. Founders can start with core features and add more later, keeping flexibility as the business grows.
<div class="post_divider"></div>
⭐Our experience
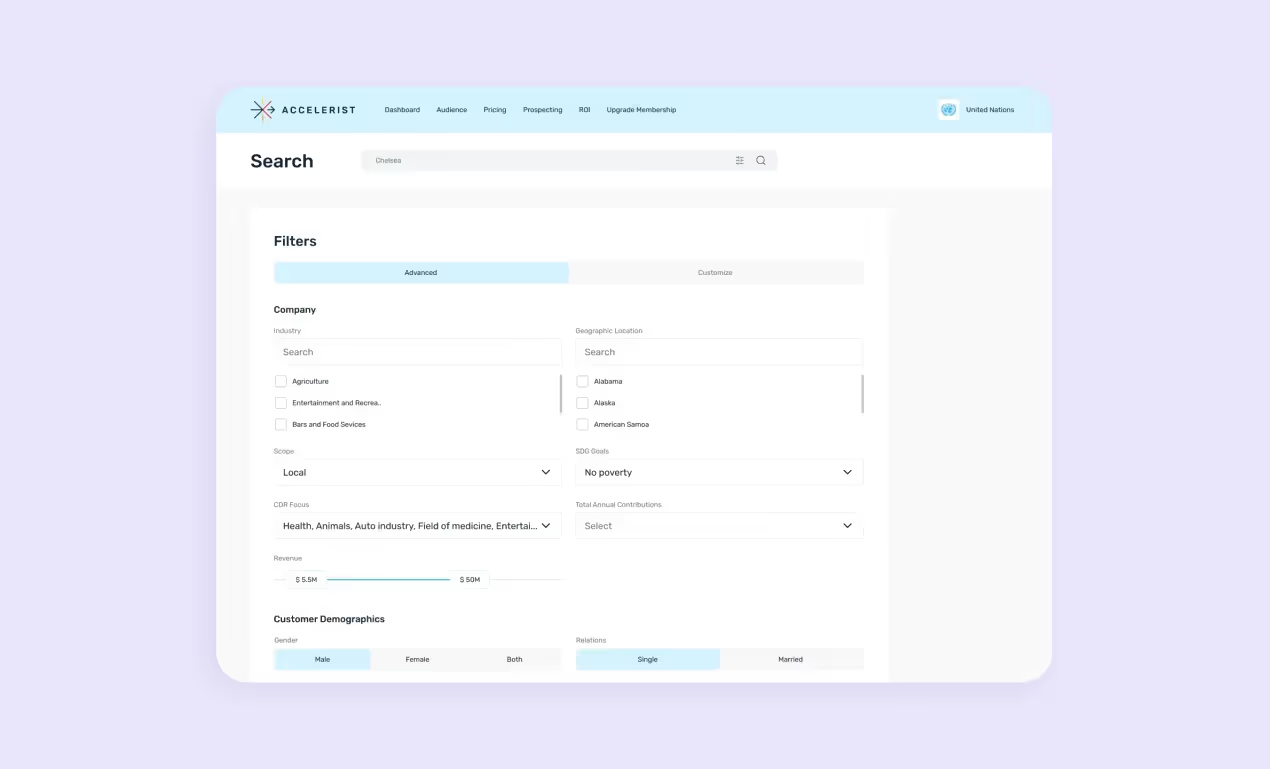
For a Texas startup, Purrweb built Accelerist — a platform connecting NGOs with corporate sponsors. We focused on saving time and budget: sponsors didn’t need to register, and their data was automatically pulled from external sources. NGOs can filter sponsors, add favorites, and send ready-made pitch emails.
The design was clean and minimal, making the platform easy to use. The project took five months and $49,400, delivering a fully functional platform ready to scale.
<div class="post_divider"></div>
React Native is ideal for businesses aiming to reach users on both iOS and Android simultaneously. Using a shared codebase keeps design, performance, and features consistent on all devices. It also reduces development and maintenance work.
Companies targeting global markets benefit from faster rollouts and easier localization. React Native can use native modules when needed. This lets features like camera, push notifications, or location tracking work smoothly on both iOS and Android.
When time-to-market is critical, React Native enables fast prototyping and MVP development. Developers can quickly build working versions, test them with users, and make improvements without starting from scratch for each platform.
React Native’s libraries and pre-built components speed up development and reduce technical work. This makes it a good choice for businesses testing ideas or preparing to pitch investors.
<div class="post_divider"></div>
⭐Our experience
We built a mobile prototype for greenhouse management. It had thousands of interactive elements on one screen. The app worked on both iOS and Android. The main challenges were server integration and keeping performance on low-end Android devices.
The app ran well even on budget devices. React Native proved effective for specialized, resource-heavy tasks.
<div class="post_divider"></div>
React Native provides good speed and easy updates. It helps build mobile apps that work well and don’t cost too much. You can use a single codebase and reusable components. A large developer community makes it easier to solve problems and speed up development.
However, total development cost still depends on factors like team structure, regional rates, and project complexity. The smartest approach combines efficient planning, the right technical expertise, and thoughtful outsourcing.
➡️ At Purrweb, we help turn ideas into fully functional React Native apps. With smart planning, clear specifications, and the right tech stack, we minimize delays and extra costs. <a class="blog-modal_opener">Fill out the form</a>, and get your project estimate within 48 hours.