One of the well-known tools that help improve products is called A/B testing. It lets you check hypotheses and evaluate users’ preferences. It means that after testing, you will be able to make a decision on changes if necessary.
However, one of the frequent issues in driving product changes through A/B testing is making sure that you don’t let an experiment be so complicated and resource-intensive that it won’t repay business benefits. You need to distribute resources and prioritize hypotheses. It is important to avoid overengineering functions. First of all, you need to receive feedback, and only then you start to make some complicated adjustments.
In this article, we’ll describe what you need to know for a quick and efficient A/B testing of your MVP.
First of all, what is A/B testing?
A/B testing is a marketing approach used to evaluate a web product’s efficiency. This method is also called split testing. In other words, A/B testing is a data-driven approach that helps approve whether or not a specific change is bringing a measurable benefit to the product. Usually, a simple A/B test consists of the next three steps:
- Analyze your current version (it’s version A) and propose changes for it (it’s version B);
- Split users’ traffic randomly, but don’t forget that 50% of clients should see version A, an the other 50% — version B;
- After some time, depending on the traffic, collect metrics of both versions and compare them to each other. This comparison will help you to analyze alterations and choose a more suitable version.
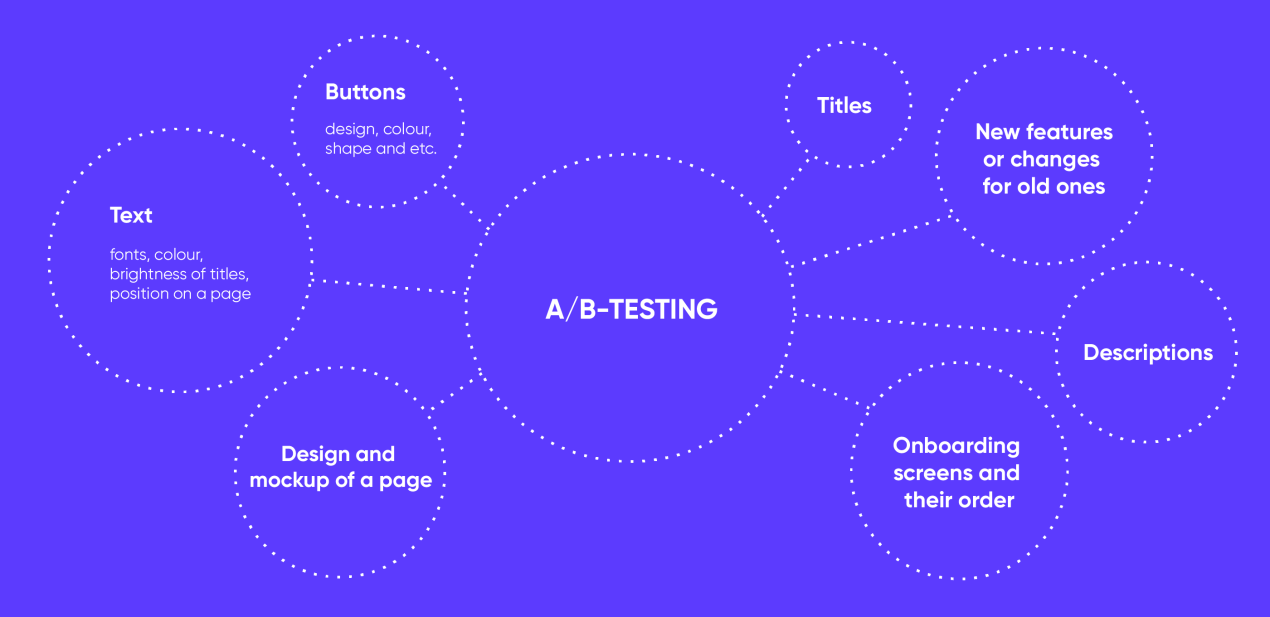
Through this approach, you can test the following variables of your MVP:
How to prepare for A/B testing during the React Native mobile development process?
Choose only one parameter for A/B testing
Of course, through your MVP analysis, you can find several variables for adjustment. However, it’s not effective to check all of them at the same time. For instance, if you test a title and an icon simultaneously, you won’t determine which change is more resultative.
Set the main target
It’s better to choose a main indicator before you start A/B testing of your MVP. Describe a hypothesis and suggest what can happen after modifying some elements, then analyze that result after testing through this hypothesis.
Randomly split the traffic
Take a decision to divide traffic randomly or equally, depending on your target and the tools that you use in testing your MVP.
Determine sample size
Don’t forget that the test duration influences the sample size. Let your test work until you collect enough views for analysis.
Clearly define success metrics
This step is an important part of split testing. The higher the level of success metric is, the more confident you can be in the results. Usually, developers set this level at 95-98%.
Before the realization of your A/B testing, you can use a short checklist. Here are some questions that can help you to check yourself:
- What part of your MVP are you going to test?
- Have you defined your target audience? Who is it?
- What are your next steps if the hypothesis is proven or disproven?
If it’s difficult to decide what you want to test, you can start by describing an existing issue. This will help you to determine what should be tested first to solve the problem.
How to conduct an efficient A/B testing of your MVP?
Here are some tips that you may use while React Native mobile development:
Focus on the needs of your target audience
Analyze the questions users usually ask and check the reviews on competitors’ apps. It will help you collect information to describe the hypothesis and start your split test.
Don’t make competitors’ mistakes
You need to start your own A/B testing without any suggestions. For instance, if a big red button in the middle of the page works for some company’s app, it doesn’t mean that it’ll work for your MVP.
Don’t use all the best practices that you can find on Google
There are a lot of web pages that offer you the best practices for testing. Be resourceful, don’t spend much of your time checking all hypotheses on these lists. Reduce the list to the tests that are useful for your React Native mobile development and can increase the level of important MVP metrics.
You need a result and need it fast!
Use only actual statistics
Don’t use simple 1-on-1 comparison metrics to determine what works better. For instance, if your version A provides a 45% conversion rate and version B delivers a 46%, it doesn’t mean that you need to change something immediately according to version B. Use only actual confidence intervals and statistically significant data.
Remember the rule: the longer, the better
It means the longer you run your A/B testing, the better data you’ll receive. Set a necessary period for testing before launch.
Don’t blame yourself because of failure, but remember that failure is expensive
If you keep testing your hypothesis and it doesn’t bring any worthy results, analyze your work: Is it doing more harm than good? How much time and resources have you spent on creating and implementing A/B testing of your MVP? If you have been trying for a long time and it hasn’t paid off, maybe it’s not because your icon needs to be modified, maybe it’s because you need to improve some of the general features.
Document all information about your test and results
Firstly, it’ll protect you from repeating the same tests that you have already done in the past. Secondly, this data collection helps to educate your team and provide new ideas for future app redesign.
Which tools can you use for A/B testing during React Native mobile development?
Of course, you can run your test by yourself and make any modifications manually. Or you may also choose an easier way to save some time. It means you can use special services for split testing. Let’s consider some tools for A/B testing of your MVP.
Apptimize
It’s a tool for testing apps. It includes a visual editor, code blocks, and dynamic variables. You can use this service for free or buy a subscription. Also, it’s possible to aggregate the tool with other testing services, such as Google Analytics or Mixpanel.
Mixpanel
It’s one more service for A/B testing of your app. This tool suggests using the MPTweakValue macro to change variables. However, it’s not for free, you have to pay for a subscription.
Split Metrics
It’s not so complicated to launch a test in this service. You need to upload graphic elements, titles, and descriptions, and then you can start split testing. Data will be collected and presented in a comprehensible format. Through this tool, you can check separate variables of the results of React Native mobile development. Initially, it’s possible to request a demo and try it.
SplitForce
This tool helps you to track the time of incidents and work with code blocks. The drawback of this service is the inability to aggregate data. Moreover, it doesn’t offer a service for free.
In conclusion
A/B testing or split testing is an important marketing approach that helps you implement necessary changes in your app without using complicated tools and much effort. The described tips are just for you to keep in mind when testing your MVP. They can help you to conduct testing before release and collect data for further improvements.
If your current product doesn’t pay off and you’re guessing that modification of some variables such as titles or the color of dedicated buttons will change it – A/B testing is an ideal approach to check your hypotheses and resolve all hesitations.


